TUFFBLOCK IS THE SOLUTION FOR YOUR DECK FOUNDATION--10% OFF FOR ALL OF JANUARY
Posted by Rick R. on Jan 10, 2022
Since their introduction to the marketplace in 1988, instant foundation blocks have been a popular method for creating strong, stable foundations for both professional contractors and DIY-ers alike.
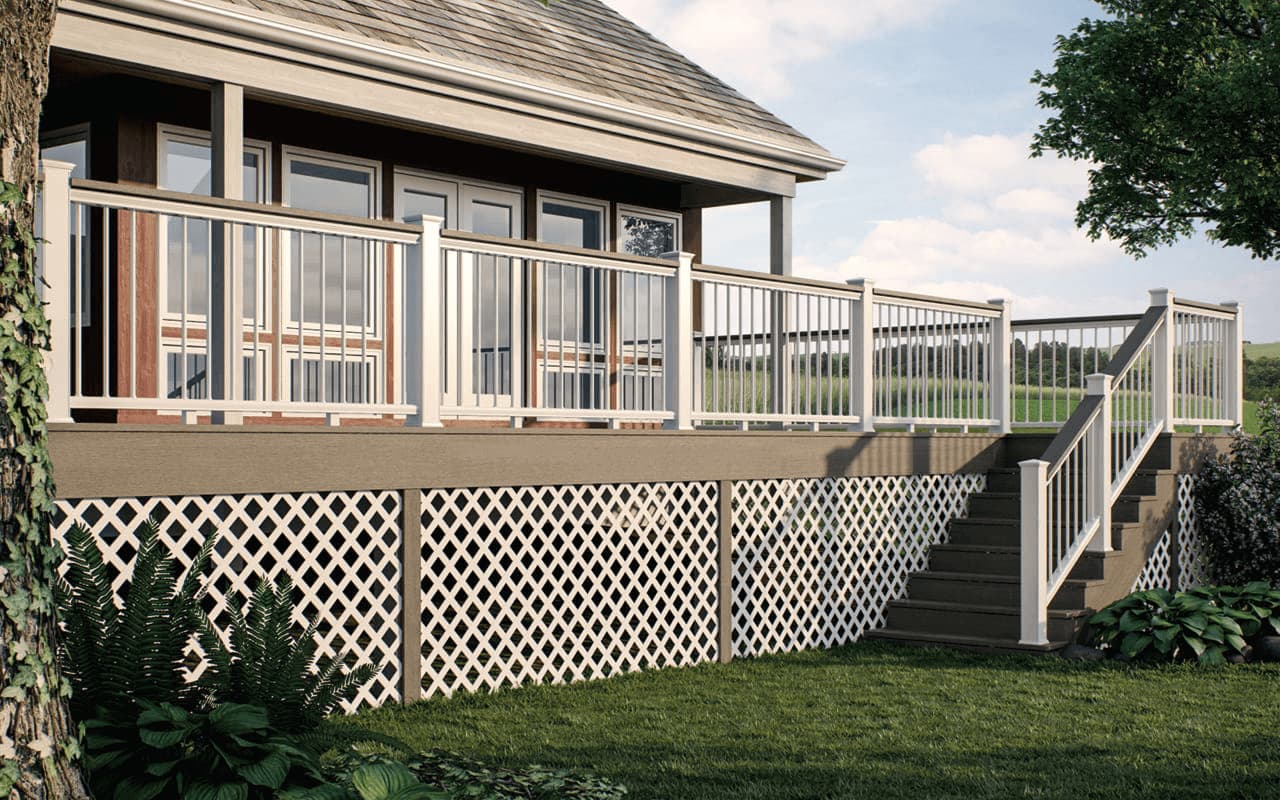
With that comes TuffBlock by BuildTuff, an easy solution for building floating decks without the use of heavy and brittle concrete blocks
TuffBlock
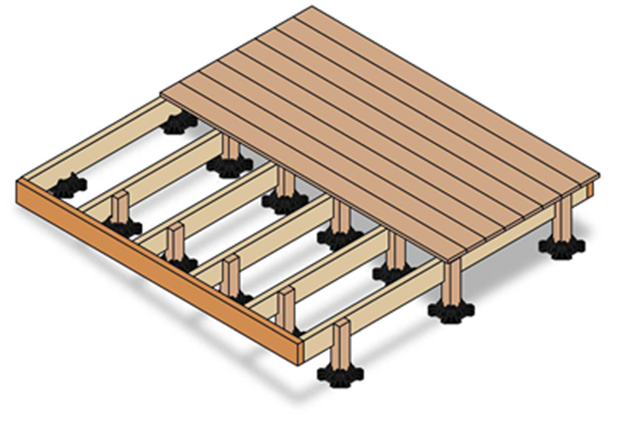
TuffBlock is more than just an instant deck foundation system — it's a versatile utility block that can be used for a number of various applications, including creating a floating deck. Weighing only 1.5 pounds each, a single TuffBlock can support over 1,700lbs! Not only are TuffBlocks the lightest deck foundation system on the market, but they're also the only block product that's able to be secured to the post/bearer for extra stability. No more digging holes and pouring concrete!
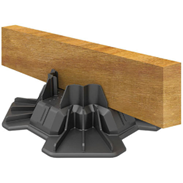

- Made of high-strength recycled plastic with a high UV rating (Each TuffBlock repurposes the equivalent of 295 bottle caps!)
- Ventilated underside to prevent moisture buildup and deter termites
- Blends into landscape and surroundings with its slim profile and satin black finish (unlike ugly concrete blocks)
- Accepts 3.5" x 3.5" or 4" x 4" posts and 1.5" - 2" joists and bearers for both low-profile and raised decks
- Will not chip, crack, corrode, or grow mold and comes with a 25-year warranty
Check out the video below to learn more about TuffBlock and get answers to commonly asked questions:
Building a Floating Deck
Step 1: Place the two corner TuffBlock piers closest to an existing structure.
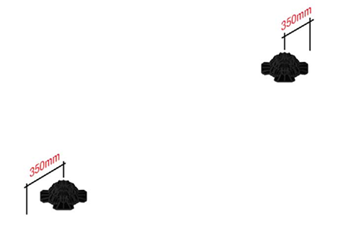
Place the TuffBlocks directly on the ground. If the ground is sloped, remove top soil from directly underneath the block until the block sits level. If the deck is going to be an extension of an existing structure, then the blocks should be as close to the structure as possible. Ensure the blocks are correctly spaced. The outside edge of the finished deck will extend out past the center of the TuffBlock piers by 350mm (14 inches) on both sides.
Don’t spend an excessive amount of time leveling the TuffBlock piers. The block can be leveled with only your eye. Any slight difference will be made up with the post. However, you want to make sure the TuffBlock piers are sitting flat. You do not want any rocking of the piers on the ground.
Step 2: Level the floor joist.
Locate the highest TuffBlock pier. Position a floor joist in or above this first block to your desired height. If the entire deck will be elevated, you will need to have a post in the first TuffBlock.
Place a floor joist in the slot of the TuffBlock pier or on the post and extend over the second corner TuffBlock pier. Now, using a level on top of the floor joist, measure the distance from the top of the floor joist to the bottom of the pocket in the TuffBlock pier. Next, cut a post to length allowing for B-B and position the floor joist on top. Make sure to verify that the floor joist is level. Do not attach the floor joist to the post yet.
If the entire deck is to be elevated, you will first need to establish the height of the first post. Once this is completed continue following the directions above.

Step 3: Position and level remaining corner TuffBlock piers.
If building off an existing structure, measure from the structure to the outside edge of the post. (For example: If the deck will be 3 meters / 10 feet deep, position the block so that the outside edge of the post is 3 meters / 10 feet from the structure.) Do NOT use the the first row of blocks as a measuring reference. Use the same width between the TuffBlock piers as the first row.

Step 4: Position and level remaining corner TuffBlock piers.
Next, remove the first floor joist closest to the structure. Temporarily position a trim board on top of the first row’s post or block and extend it to the outside corner block. Using a level on top of the trim board, measure the distance from the top of the trim board to the bottom of the pocket on the TuffBlock pier. Cut a post to length. Verify the trim board is level. When level, remove the trim board and repeat for the opposite side.

Step 5: Place the two corner TuffBlock piers closest to an existing structure.
Place the TuffBlocksdirectly on the ground. If the ground is sloped, remove topsoil from directly underneath the block until the block sits level. If the deck is going to be an extension of an existing structure, then the blocks should be as close to the structure as possible. Ensure the blocks are correctly spaced. The outside edge of the finished deck will extend out past the center of the TuffBlock piers by 350mm (14 inches) on both sides.
Don’t spend an excessive amount of time leveling the TuffBlock piers. The block can be leveled with only your eye. Any slight difference will be made up with the post. However, you want to make sure the TuffBlock piers are sitting flat. You do not want any rocking of the piers on the ground.
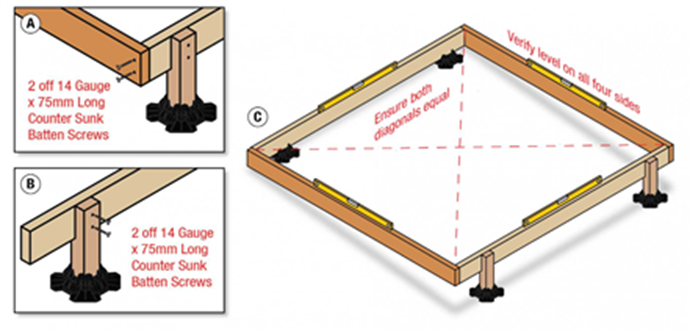
Step 6: Attach remaining floor joists.
Position and attach the remaining floor joists to the trim boards using two 75mm (3-inch) countersunk batten screws to attach the floor joist to the trim board.
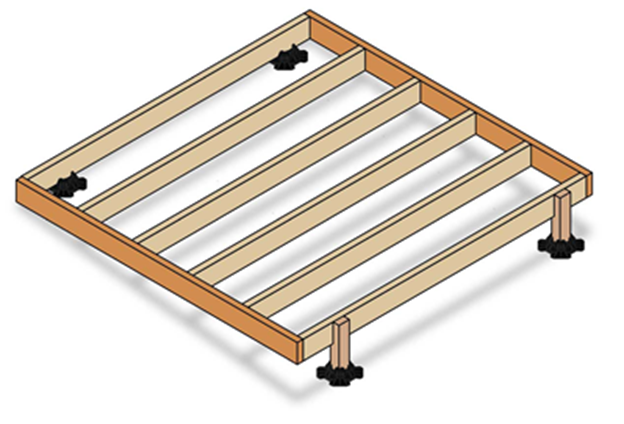
Step 7: Position remaining TuffBlock piers.
Using the frame as a guide, position the remaining TuffBlock piers directly beneath the frame. The blocks on the perimeter of the deck should be 300mm (12 inches) in from each end. When positioning the blocks, the dimensions do not need to be exact; however, do not exceed the maximum span of 1.5 meters (5 feet) between blocks. Be sure to have all of the TuffBlock piers aligned in a straight row and spaced evenly.
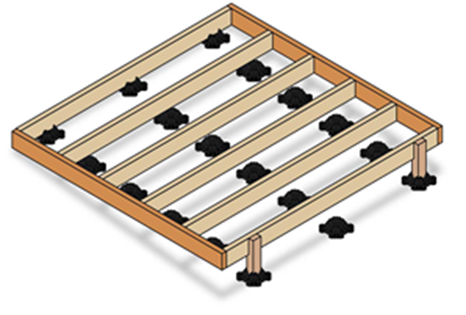
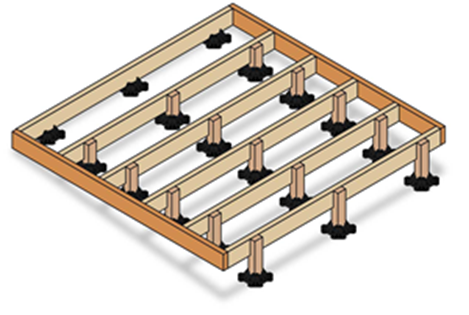
Step 8: Fill the remaining posts.
Cut posts to length and position them between the floor joist and the TuffBlock pier. Repeat this step until all posts are cut and positioned. Next, secure all floor joists and posts using two 75mm (3-inch) countersunk batten screws.
Step 9: Attach the decking.
Starting from one side of the deck, attach the first deck board so it’s flush to the edge of the deck. The deck board will overhang the first floor joist closest to the existing structure. Leave a 3mm to 6mm (0.125 to 0.25 inch) gap between the end of the deck board and the edge of the structure. Next, secure the remaining deck boards as per the manufacturer's instructions.