Product Installation and Knowledge
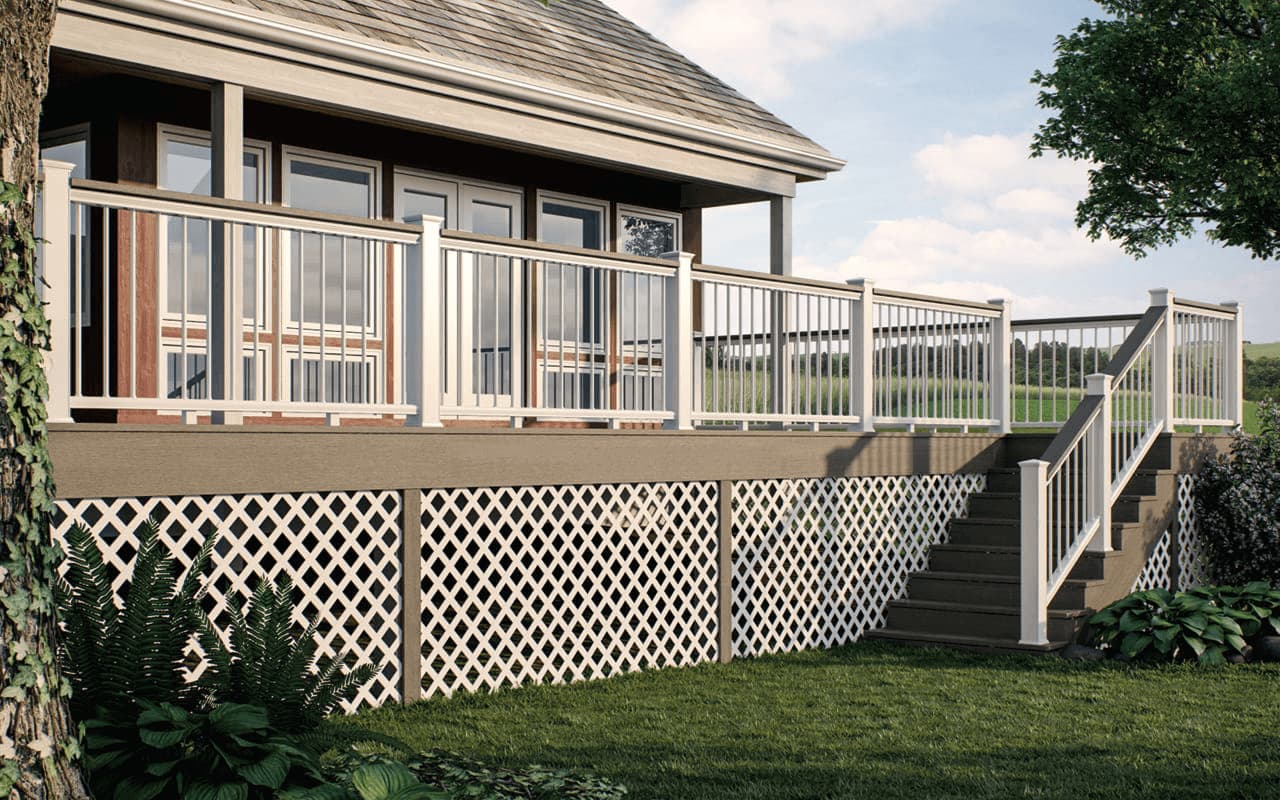
RDI provides outdoor railing solutions that feature style, performance and durability and safety in all of our products. And with a vast range of code compliant safe railing options such as aluminum, vinyl, composite, and steel railing, RDI is the perfect choice for homeowners, contractors and architects. RDI also offers a full line of vinyl post sleeves, post wraps and structural porch posts.


Deck Railing:
- Endurance Vinyl Railing:
- Transform Composite Railing:
- Excalibur Steel Railing:
- Avalon Aluminum Railing:
ADA Secondary Hand Rail:
Crossover Products:
HideAway Privacy Railing:
Outdoor Accents:
![]()
Allow Deckorators to take the enjoyment of personalizing your outdoor living space to a whole new level. Our composite decking & ALX Contemporary aluminum deck railing, Round ~ Square ~ Face Mount balusters, Solar ~ Wood ~ Metal post caps and decking lights make it easy to extend your living space…outside. The pioneering spirit behind our brand keeps us on the leading edge of deck ideas and porch design innovation.
Deck Railing:
Stone Post Covers:
Deck Lighting:
- Solar Deck and Dock Light Installation Instructions - Trilingual - [pdf - 72 KB]
How to Install Wood Post Base Trim:
Our post base trim comes preassembled, with three sides joined together and a separate fourth side. To install, follow these two easy steps:
-
Apply an exterior-grade construction adhesive to the inside of the three-sided section and slide it firmly around the post
-
Apply an exterior-grade construction adhesive to the inside of the remaining piece and slide into place
![]()

![]()
http://invisirail.com/wp-content/uploads/2017/07/IVR_Install_Manual_lowres.pdf
![]()
One piece stone post cover:
- https://docs.wixstatic.com/ugd/3cb45d_7fb2d587e2f64cdb85b24b484584f44f.pdf
Two piece stone post cover:
- https://docs.wixstatic.com/ugd/3cb45d_9f91706183164573a2d5e0b77a46afc4.pdf

POST CAP CARE:
METAL DECK POST CAPS:
Our copper finish, stainless steel, and brass post caps come with a thin, clear marine lacquer designed to protect them before and during installation. Once exposed to the elements, the sun’s ultraviolet rays, moisture and pollution begin to break down this coating, exposing the metal underneath.
COPPER FINISH DECK POST CAPS:
In its natural state, copper breaks down in the elements and develops a patina. In general, copper progresses from a natural salmon color to a series of russet browns and grays, and finally to a blue-green or gray-green patina.
- To maintain the shiny look, apply a car wax immediately after purchasing the cap, and reapply every 3 to 6 months.
- To remove an already tarnished finish, remove the old coating with mineral spirits and grade 0000 steel wool. Buff with grade 0000 steel wool for a satin finish. For a mirror-like finish, apply a car wax, or spray with a clear lacquer or polyurethane and let dry, and then apply a car wax.
- To encourage a natural patina, remove the lacquer with mineral spirits and grade 0000 steel wool.
STAINLESS STEEL AND BRASS DECK POST CAPS:
Stainless steel has a hard oxide coating making it resistant to stains. To maintain this coating, clean periodically with a mixture of vinegar and club soda. As with the copper finish, our brass post caps are protected with a thin, clear coating of lacquer. Periodic reapplication of this clear coating will help to protect the brass.
COLORED METAL DECK POST CAPS:
Our Victoria post caps come in a variety of colors, including white, green, real patina, pewter and black. These colors are a powder-coated, baked-on finish that is extremely hard and durable, rarely requiring maintenance.
WOOD DECK POST CAPS:
As with all wood products, we recommend that you coat these with a high-quality exterior finish to preserve the wood's natural beauty and ensure a lifetime of enjoyment. Apply to all wood areas, including the underside of the cap, before installation.
DECK POST CAPS WITH WOOD BASE TRIM:
If your post cap has a wood base, apply a high quality exterior finish to all wood areas before installation. We recommend reapplying the finish annually to preserve the wood's natural beauty and protect it from the elements.
GLASS DECK POST CAPS:
Exposure to the elements may cause the copper-wrapped solder on your glass post cap to oxidize and lose its original color. Applying car wax before placing the post cap outdoors will help to prevent the initial oxidation. We have found regular furniture polish to have the same affect, but its prevention time may vary based on geographical location. Reapply the car wax/furniture polish every 3 to 6 months as needed.
Wood Post Caps:
Manufacturer and wholesale supplier of fine outdoor cedar and redwood deck / fence post caps, finials, pergolas, arbors, decorative fences, decorative gates and accessories.
A marine grade adhesive can be used to fasten wooden caps to the fence posts.
Slip Over Post Caps
Materials:
All of our slip over post caps are available in clear, vertical grain, kiln dried, Redwood and Clear Western Red Cedar. These wood types are best known for their durability in harsh environments, and their beauty.
Construction:
Slip over fence caps are crafted using a 5 piece construction with V-nails in each corner of the molding. 12 or more stainless steel staples are used to permanently fasten the molding to the underside of the wooden post cap.
Installation:
For a nail-free look, simply apply an exterior marine adhesive like 3M 5200 to the top of the post and slip the post cap over. Stainless steel nails may be used as an alternative, but not necessary.
Non-Slip Over Deck Post Caps:
Product Care and Installation
Clear, all heart, vertical grain, kiln dried, Redwood and clear Western Red Cedar.
Construction:
Non-slip over wooden outdoor post caps are crafted utilizing one piece construction.
Installation:
With our post caps, there is no costly on-site assembly! Simply apply an exterior marine adhesive, such as 3M 5200 to the top of the post. Pre-drill the cap and affix with stainless steel nails. Your NPC Post Cap is now secure.
Finial Care and Installation:
Preparation:
All wood post cap finials are constructed of laminated clear, Redwood and Western Red Cedar. They should be sealed BEFORE installation with an oil base primer, paint, stain, or preservative to ensure long life.
ALL FINIALS MUST HAVE A PROPER SEALER AND/OR PAINT APPLIED TO PREVENT CRACKING.
![]()
![]()
- https://genstone.com/insights/how-to-install/category/guides
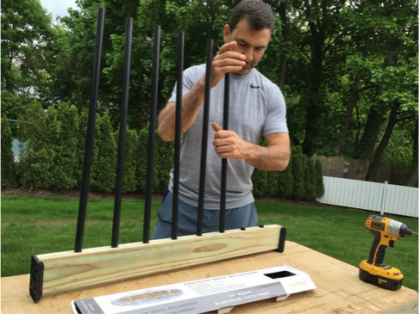
Installing Inline deck balusters
Spindles, balusters or pickets are the rail infill used to provide safety and esthetics for deck railings. Most building codes prohibit deck railing from having any openings that would allow a 4" sphere to pass through. This rule allows the need for an attractive and economical repeated system for filling in the spaces between structural rail posts.
Because of the specific spacing requirements, you will need a lot of spindles or balusters to build out a rail section, even for a short length of rail. Balusters or metal spindles will more than likely be the most expensive rail component for your project, but it will be well worth the cost. Years ago, most deck rail construction consisted of wooden 2x2 pickets nailed to the deck rim and top rail to meet the requirement. This resulted in warped handrails and not the most esthetically pleasing look. And let’s not forget the yearly maintenance to keep these spindles in decent shape.
Here are a few steps on how to install metal round or square balusters into a wooded top and bottom rail system. We offer multiple sizes, colors and are available in ¾” round or square.
- Measure the distance between your structural rail posts. You can subtract ¼” if you choose to use our railing connectors. This is recommended for many reasons. One, it creates a stronger bond than toe nailing or screwing upper and lower rails to your posts. Secondly, eliminates the chance of the rails expanding and extracting during the seasons causing unwanted gaps.
- Cut the 2x4 top and bottom rails to the proper lengths. We suggest that you use a miter saw and cut each railing section one at a time. Then clamp the two rails together.
- Mark the center of your rails. Make your marks on the inside faces on both the upper and lower rails. These marks will act as a guide as you lay out and screw in your baluster connectors.
- We recommend making a line at 4”. This will be the center mark for your baluster connector. By doing this the spaces in between balusters should be 3-3/4”. This will be in line with most codes for correct baluster spacing.
- Be sure to screw in the baluster connectors into the center of the 2x4 upper and lower rails.
- Install bottom of the lower rail no more than 3-1/2” above the deck floor, if you are using a 2x4 or 2x6 rail cap with 26" balusters to assemble a 36" high guardrail.
- Push down your balusters into the bottom rail connectors first. Next, work from one end to the other to slide the balusters into the top rail connectors. Secure your top rail to the rail posts using the recommended railing connectors install your top cap to finish the rail.
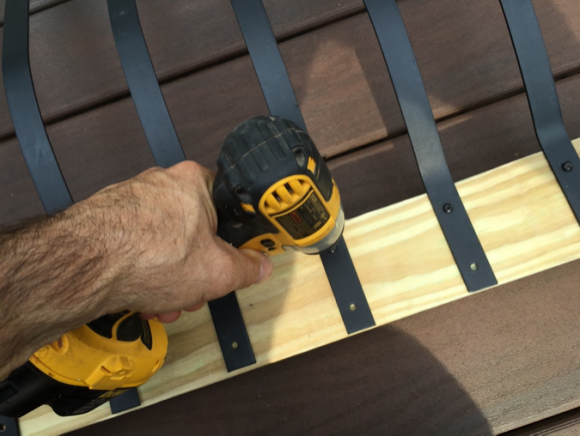
Installing Face Mount Balusters
Spindles, face mount balusters or flat pickets are the rail infill used to provide safety and esthetics for deck railings. We offer Deckorators or Dekpro face mount balusters. Styles include arc – baroque – traditional – belly and bow. Most building codes prohibit deck railing from having any openings that would allow a 4" ball to pass through. This rule allows the need for an attractive and economical repeated system for filling in the spaces between structural rail posts.
Because of the specific spacing requirements, you will need a lot of spindles or balusters to build out a rail section, even for a short length of rail. Balusters or metal spindles will more than likely be the most expensive rail component for your project, but it will be well worth the cost. Years ago, most deck rail construction consisted of wooden face mount 2x2 pickets nailed to the deck rim and top rail to meet the requirement. This resulted in warped handrails and not the most esthetically pleasing look. And let’s not forget the yearly maintenance to keep these spindles in decent shape. (no one likes to sand and paint on a yearly basis)
Here are a few steps on how to install metal pickets into a wooded top and bottom rail system
- Measure the distance between your structural rail posts. You can subtract ¼” if you choose to use our railing connectors. This is recommended for many reasons. One, it creates a stronger bond than toe nailing or screwing upper and lower rails to your posts. Secondly, eliminates the chance of the rails expanding and extracting during the seasons causing unwanted gaps.
- Cut the 2x4 top and bottom rails to the proper lengths. We suggest that you use a miter saw and cut each railing section one at a time. Then clamp the two rails together.
- Mark the center of your rails. Make your marks on the inside faces on both the upper and lower rails. These marks will act as a guide as you lay out and screw your face mount balusters.
- We recommend making a line at 4”. This will be the center mark for your baluster. By doing this the spaces in between balusters should be 3-3/4”. This will be in line with most codes for propper baluster spacing.
- Be sure to screw in the baluster into the center of the 2x4 upper and lower rails.
- Install bottom of the lower rail no more than 3-1/2” above the deck floor, if you are using a 2x4 or 2x6 rail cap with 26" balusters to assemble a 36" high guardrail.

Cedar Care:
Your Western Red Cedar items must be treated prior to being installed. Treat the entire cap, top, bottom, all sides, inside and out! Apply a thin coat and wipe off excess with rag. Repeat this process at least one more time after first coat is completely dry. The following is recommended:
• Exterior Urethane
• Exterior Stain
• Exterior Paint
These products will NOT BE COVERED UNDER WARRANTY if they are NOT treated prior to being installed. It’s very common for fences to be installed where the wood is wet (sometimes called “green”). So before the fences get their treatment (paint or stain), they will be installed and left to dry out, and then treated when dry. Our post caps, however, are always shipped out, made from kiln dried wood. Meaning they are completely dry, and do not need time to dry out. So it is extremely important that you treat the caps before they get installed outside. If you leave the caps out untreated, they will most likely crack due the sun exposure, having no protection.
Azek Care:
These AZEK products must be painted prior to being installed or they will discolor and void the warranty. The following is recommended:
1. AZEK doesn’t have a finish and that leaves the material subject to dirt, smudges, mold and mildew.
2. Properly prepared and painted with even brush strokes gives the appearance of finely painted wood.
3. A properly painted finish will last for years protecting the substrate from mold, mildew and the UV rays from the sun.
AZEK surfaces must be clean, dry and void of any foreign material such as dirt, oil, grease or other contaminates that may come from normal handling, storage and/or installation prior to painting. Use a 100% acrylic latex paint with colors having a Light Reflective Value (LRV) of 55 or higher. These AZEK products WILL NOT BE COVERED UNDER WARRANTY if they are not treated prior to installation.
TIPS FOR INSTALLING ON POSTS: We recommend pre-drilling the caps, and using a small finish screw to adhere them to the posts. This makes it easy to take the cap off if ever it needs to be replaced.